
DIY Wedding invitations
- Feb 19, 2017
- 4 min read
Call me crazy (my fiance did) but your wedding invitations are so important. They're the first glimpse people get into your big day! So there had to be no shoddy invites from us two! I was a bit manic when it came to finding the perfect style. There are lots of stunning invitations out there and Pinterest has some fantastic ideas.
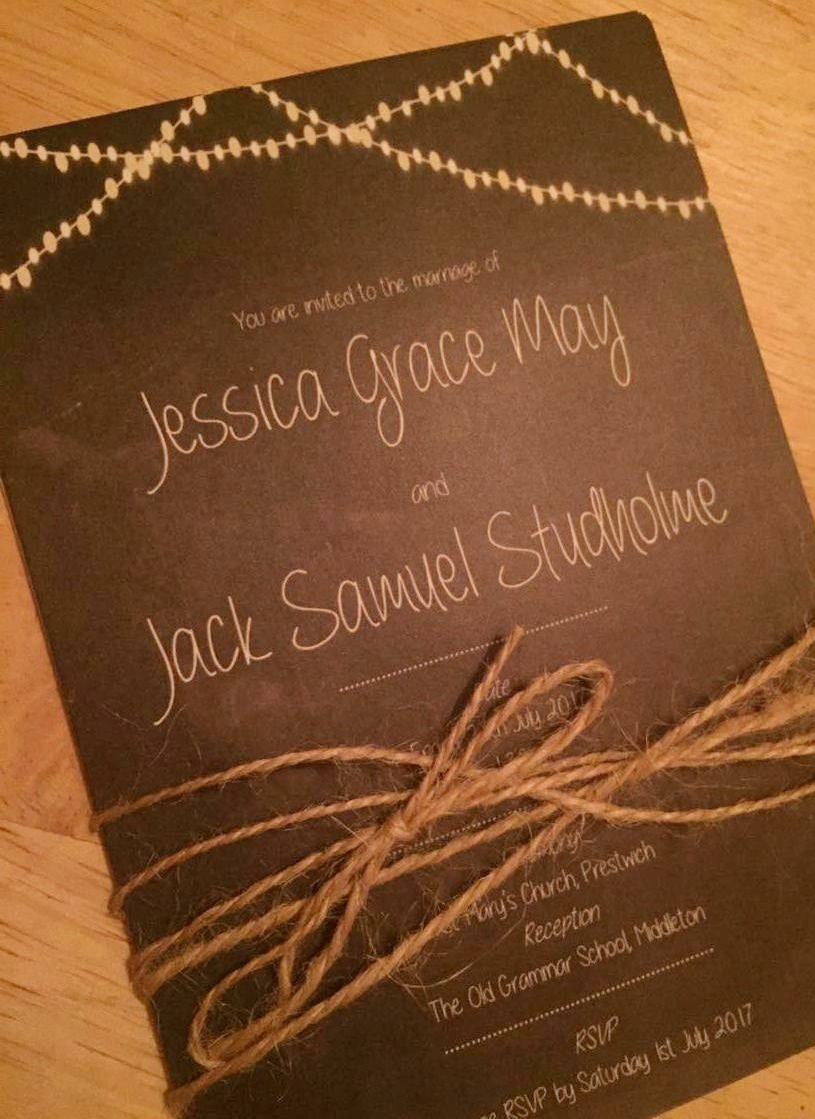
After what felt like weeks of looking I finally found a chalkboard design which i loved. The only problem was ... Once I had added up how much it would cost for all the elements we needed, for the amount of people we needed to send them to, it was going to cost me a small fortune. Not good for a lady on a budget. So I decided to design my own. From scratch. What's the worst that can happen right? (Apart from ordering 100 invitations with the wrong RSVP address on .. but we'll move swiftly on from that)
Believe it or not i designed my invitations on Microsoft Publisher. Yes really.

Here's a step by step guide on how to design your own:
1. Choose a concept I knew I wanted to incorporate fairy lights and chalk boards into my design. I sketched out a few ideas before i jumped in. I'm using this design i created across the wedding stationary. If you'd like to do the same make sure you love your idea because it'll be everywhere before you know it.
2. Background
WHen choosing your invitation background ensure that the picture has a really high resolution. You don't want to spend days designing something for it to be rejected at the printers for being blurry. You can filter google image searches by photo resolution, this saves so much time.
3. clip art
I knew i wanted strings of fairy lights on my invitations. i hunted all over google and couldn't find the right ones. then i found you could actually buy clip art packs on etsy.com. they're great resolution quality and you get just what you need. they're like £3.99 and for you to use them on all of your stationary, an absolute bargain.
4. font
I downloaded these dreamy fonts onto my laptop using a free website i found on google. There are loads out there, I found mine on dafont.com Once downloaded just double click the install button and it will appear with your regular fonts on your programs. so much cuter than comic sans.
5. Content
I was worried about writing everything i needed to on my invites! I read a fair few blogs for help so here it is in a nutshell:

- The invitation itself
This will have your name, your partners name, the church/venue and the reception venue. Its also useful to give guests a deadline for their RSVP.
- Guest Information Page
This is what it says on the tin! We included the addresses of both venues, places for people to stay and our gift registry information (along with the Prezola gift card)
- RSVP card
We designed our rsvp to be double sided. On one side had the part for the guests to fill in while the other side had our address and a space for a stamp. This made it really easy for our guests to fill it in, pop on a stamp and pop it in the post just like a postcard!
We also included a song request section on our rsvp ensuring the dance floor will always have someone on it!

I created lots o text boxes and it was just a case of jiggling them around until i like it! Very technical.
6. Save
Make sure you 'group' all of your objects and then save your creation as an image, this makes it a lot easier at the printing stage.
7. Print
Its go time! *MAke sure you get someone to check over your invitations before you spend £50 printing them incase you get them wrong and your really piss of your other half - speaking from experience. maybe* I got my invitations printed on vistaprint.com. i printed them through the business section as a postcard. i upgraded the card quality and made sure they were matt as i thought it might look more expensive. They arrived in no time and look absolutely amazing!
8. Finish
I decided to finish my invitations with hessian string. i bought on bulk on ebay.com and simply wound it round and tied in a little bow. so simple but really effective.
They were then put into brown paper envelopes and sealed with a personalised stamp.

I ordered my stamp from skullandcrossbuns.com for £13 and i used a white ink stamp i found from amazon for around £2.
So there we are!
I adore my invitations and the fact i designed and made them myself gave me so much pride when i was giving them out. I can't wait to design the rest of our wedding stationary in theme with the invitations - keep your eyes peeled for more blog posts about my wedding DIY ventures as i give even more of my secrets away!
Jess x
Comments